json schema配置化表单的初步实现
前言
在平常的工作中,写后台表单往往不可避免。但是长时间做这种工作却非常消耗一个人的精力和体力,作为一个成熟的软件工程师,应该做一套简单的工具,减少这种低端的劳动。因此针对最近的一个重构需求,本人为此,写了一套简单的利用json schema生成表单的工具。目前整体还比较简陋,但是整体的大框架应该不会在有改动了,后续会整理成一个库,能够更好地移植。
其实现今,利用json schema生成表单的开源工具并不少,至于自己为什么要重新再编写一套呢,主要是有两点考量:
- 能够更好地做定制。虽然开源工具也可以,但是需要定制的时候,都是焦头烂额的时候,没太多时间去理解作者的意图: -)
- 自我锻炼:-)
思路
整体思路就是,将一份含有表单信息的json文件,通过转换我们编写的转换器,生成各个不同类型的组件。我们需要全局存储一个store对象,用于存放每个组件中对应的值,以及一个全局rules dependence 数组,用于存放所有组件规定的校验规则函数,以便于在用户确定填写完毕后,统一进行一次校验。
首先自己采用的是标准的jsonschema的格式规范。 使用这种通用的规范主要的好处是能够有很多通用的校验库能帮忙做校验,比如ajv,async-validator 。
如下图的json, 就定义了一个属性名为name和radio的对象。而对于对象每个属性的内部,则又有新的定义(类似不断地循环递归,通过这种方式,我们能完善地描述出一个对象)。
const configJson = {
  'type': 'object',
  'properties': {
    'name': {
      'title': '姓名',
      required: true,
      'type': 'string',
      'style': {
        'fontSize': 16,
        'width': 200,
        'marginTop':10
      },
      'message': '不能为空'
    }
  },
	'radio': {
      'title': '单选',
      required: true,
      'type': 'string',
      'enumValues': [
        'a',
        'b',
        'c'
      ],
      'enumNames': [
        '选项1',
        '选项2',
        '选项3'
      ]
    },
}
组件在接收到了这份json文件后,会遍历这份json文件,根据type字段、format字段以及是否有枚举值 来选择出正确的组件,从而渲染。
实现
组件SchemaForm的接受的props 类型
type SchemaFormProps = {
  schemaConfig: schemaConfigType; //schemaConfig类型
  store: Object; //全局类型
  setDep: DepFuncType; //用户收集规则检验函数的函数
  handleChange: (key:string,value:valueType) => void; //用于更改store
};
因为目前需求并不需要array类型作为json schema的root类型,因此在SchemaForm中,我们只需要渲染obj类型即可,在后续迭代中,再添加数组类型。
//SchemaForm.tsx
const { type } = this.props.schemaConfig;
return (
  <div className="schema-form">
    {type === 'object' &&
    <RenderObjSchema schemaConfig={this.props.schemaConfig} store={this.props.store} handleChange={this.props.handleChange} setDep={this.props.setDep} keyPath={[]}/>
    }
  </div>
);
renderObjSchema中,则会对具体的类型和schema参数 选择出具体组件,
import * as React from 'react';
import widgetsLibrary from './widgetsLibrary/map';
import _, { rest } from 'lodash';
import SchemaForm from './SchemaForm';
import Schema from 'async-validator';
import * as moment from 'moment';
import {valueType} from './widgetsLibrary/map'
import {schemaConfigType,rulesType} from './type'
interface ObjSchemaType {
  schemaConfig: schemaConfigType;
  store: any;
  handleChange: (key:string,value:valueType) => void;
  setDep: any;
  keyPath: string[];
}

const stringHandler = (schemaConfig:schemaConfigType) => {
  const {format, ...restProps } = schemaConfig;
  let Component = widgetsLibrary.InputWrap;
  if(format && format === 'DatePicker'){
    Component =widgetsLibrary.DatePickerGroup;
  }
  if (restProps.enumValues) {
    Component = widgetsLibrary.RadioGroup;
  }
  return Component
}
const numberHandler = (schemaConfig:schemaConfigType) => {
  return widgetsLibrary.InputNumber;
}
const booleanHandler = (schemaConfig:schemaConfigType) => {
  return widgetsLibrary.Switch
}
const arrayHandler = (schemaConfig:schemaConfigType) => {
  const { format } = schemaConfig;
  if (format === 'RangePicker') {
    return widgetsLibrary.RangePickerGroup;
  }
  if(format === 'MultiSelect') {
    return widgetsLibrary.multiSelect
  }
}
const typeHandlerMap = {
  'string': stringHandler,
  'number': numberHandler,
  'boolean': booleanHandler,
  'array': arrayHandler,
}
export default class RenderObjSchema extends React.Component<ObjSchemaType> {
  constructor(props:ObjSchemaType){
    super(props)
  }
  getValue(path: string){
    return _.get(this.props.store, path, undefined);
  }
  setChange(key: string){
    return (value: valueType) => {
      console.log(key,'---key',value,'---value');
      this.props.handleChange(key, value);
    };
  }
  validateFunc(rules: rulesType){
    return (path: string) => (key:string) =>() =>{
      const descriptor = {
        [key]: rules
      }
      const validator = new Schema(descriptor)
      const objVal = {
        [key]: this.getValue(path)
      }
      return validator.validate(objVal, (errors,) => {
        if (errors) {
          return errors;
        }
      });
    }
  }
  render() {
    const {schemaConfig,store,handleChange,setDep,keyPath} = this.props
    const {properties} = schemaConfig
    return (
      <div>
        {Object.keys(properties).map((key) => {
          const { type, ...restProps } = properties[key];
          let Component = widgetsLibrary.InputWrap;
          if (eval(restProps.hide)) {
            return <></>;
          }
          if(['string','number','boolean','array'].some((item:string) => item === type)){
            Component = typeHandlerMap[type](properties[key])
          }
          if (type === 'object') {
            return <RenderObjSchema
              schemaConfig={properties[key]}
              store={store}
              handleChange={handleChange}
              setDep={setDep}
              keyPath={[...keyPath,key]}
            />
          }
          return (
            <Component
              key={[...keyPath,key].join('.')}
              onChange={this.setChange([...keyPath, key].join('.')).bind(this)}
              onBlur={this.validateFunc(properties[key])([...keyPath, key].join('.'))(key).bind(this)}
              setDep={setDep}
              required={properties[key]['required'] || false}
              type={type}
              value={this.getValue([...keyPath, key].join('.'))}
              {...restProps}
            />
          );
        })}
      </div>
    )
  }
}
最后则是组件库的封装,这里采用了高阶组件的方式,对所有的常用组件首先进行了一个简单的通用封装,之后又对具体内部再做了一次特定封装。
const wrap = (Component: React.ComponentType<wrapPropsType> ) => {
  return class WrapComponent extends React.Component<
    wrapPropsType,
    wrapStateType
  > {
    constructor(props:wrapPropsType) {
      super(props)
      this.state = {
        errMsg: ''
      }
    }
    handleErr(errMsg:string) {
      this.setState({
        'errMsg':errMsg
      })
    }
    onChange(e: eventChangeType) {
      const {type} = this.props
    }
    componentDidMount(): void {
      const {setDep,onBlur} = this.props
			//此处做依赖收集
      setDep(
        () => {
          onBlur().then(() => {
            this.handleErr('')
          }).catch(({errors}) => {
            this.handleErr(errors[0].message)
          })
        }
      )
    }
    render() {
      const { title,required, ...restProps } = this.props;
      return (
        <div>
          <span>
            {
              required && <span className='required'>* </span>
            }
            {title} </span>
          {<Component handleErr={this.handleErr.bind(this)} {...restProps} />}
          {this.state.errMsg &&
           <div className='error-message'>{this.state.errMsg}</div>}
        </div>
      );
    }
  };
};
Input的特定封装
const InputWrap = (props: wrapPropsType) => {
  const { value, onChange,onBlur,handleErr,setDep, ...restProps } = props;
  const newOnChange = (e:ChangeEvent<HTMLInputElement>) => {
    onChange(e.target.value);
  };

  const newOnBlur = (e: FocusEvent<HTMLInputElement>) => {
    onBlur().then(() => {
      handleErr('')
    }).catch(({errors}) => {
      handleErr(errors[0].message)
    })
  }
  const newValue = value === undefined ? '' : value as string;
  return <Input value={newValue} onChange={newOnChange} onBlur={newOnBlur} {...restProps} />;
};
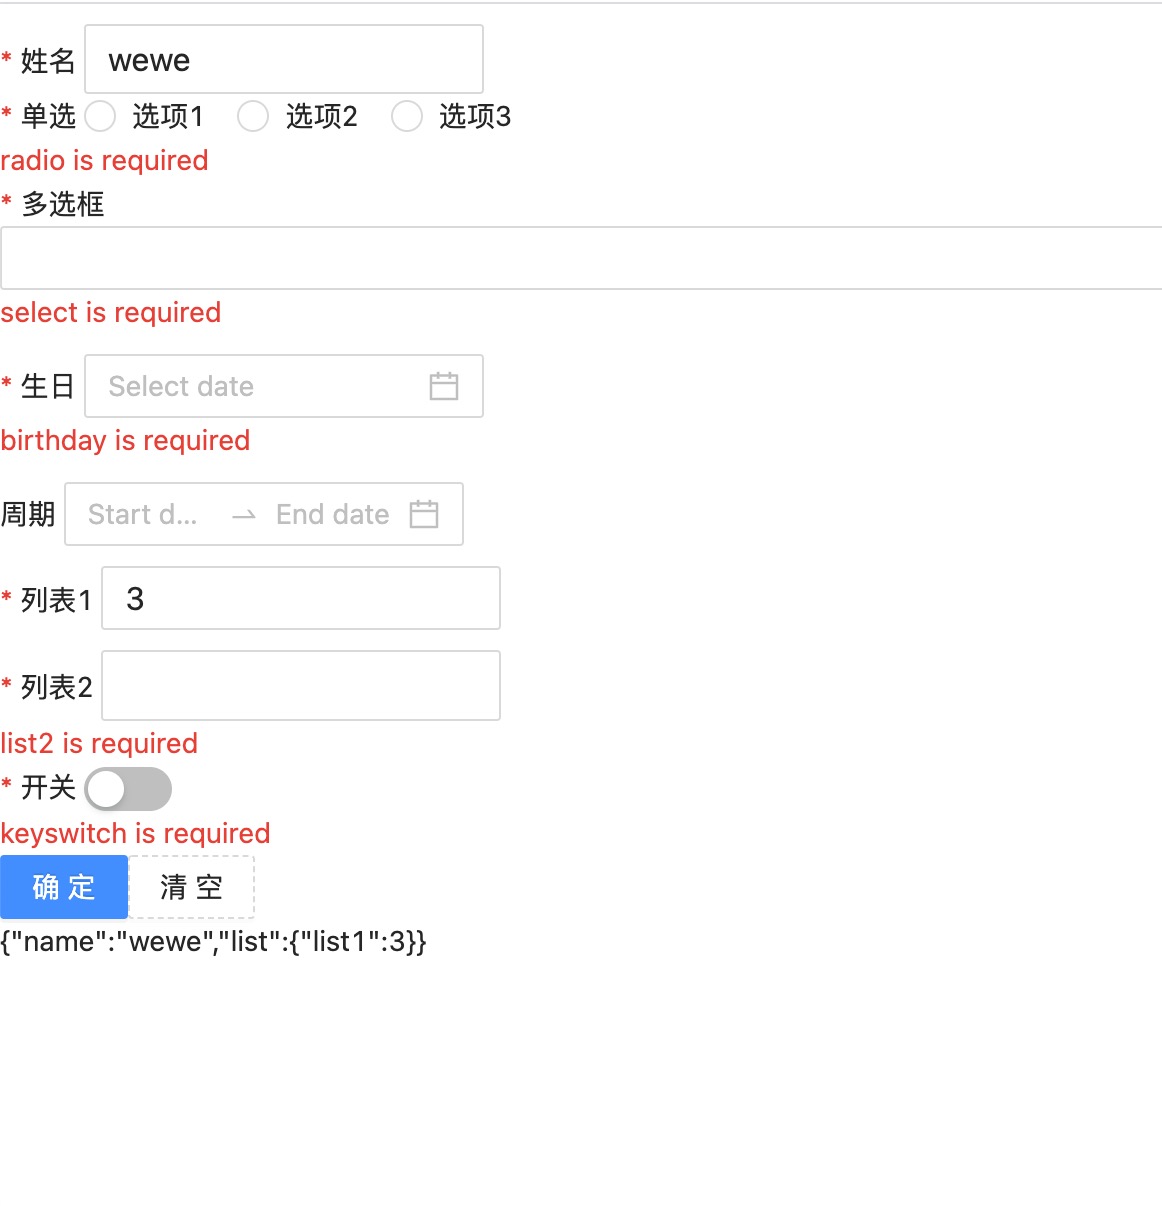
每个组件内部值的更改,都会利用最上层的传递下来的更改函数,更改当前state内部对应的属性值。最后的效果如下图所示:
结论:
最后确实做出了一个简单的shcema 生成表单的工具,但是!!! 因为业务场景太过复杂,发现完全承载不了逻辑, 原因:1.是因为整体的封装不够好,主要是校验部分和逻辑联动部分。于是最后作罢,还是老老实实地采用了手写的方式。但是确实对自己的眼界有所提升,之后会根据开源的Xrender和uniform的思路,重新设计一版能投入正式线上使用的表单工具库,重新发表一篇文章。这回当作试水的实验吧。